Modeling with the Masters® is an Educational function of the NMRA. The MWTM® Program features hands-on clinics presented by modelers who have earned the title Master Model Railroader® (MMR®) through their successful participation in the NMRA’s Achievement Program. The following clinics will be available at the Daylight Limited PCR Convention 2025.
Clinic #1: Signs and Lettering
Title: “Signs and Lettering (HO scale only) Cost: $25 Scale: HO Only
Date: Time: HO Only Time of clinic: 2.5hrs
Lead Instructor: Clark Kooning, MMR assisted by Peter Youngblood, MMR.
Description: Looking at trying to add life to your layout, well Clark will show you how to add signs and lettering to structures. We will provide a couple DPM building fronts to practice with. We will show you how to make your own signs, application of paper signs, metal looking signs, a handing sign and using stencils for signs…. If your in another scale don’t pass on it because its HO only, this clinic give the techniques to apply in any scale.
Tool List: Self-healing cutting mat
#1 X-acto knife
#11 X-acto blades (5 pack)
12″ or 6″ HO scale metal Ruler
Needle Nose Plier
Small Pin Vice
#78 Drill Bits (2 in case one breaks)
2 Paint Brushes (#00 & #3)
Emery Boards (the kind women use for their nails)
Black Marker Pen (Fine tip)
Liquid Styrene Cement.
Silicone Paint brush’s set ( Amazon or Art supply stores)
White Glue
5 Small sandwich bags
Silicone Sculpting Tools, 5 PCS Clay Carving Tools Paint Color Silicone Brush Matching Tool Polymer Clay Tools Pottery Trimming Tools for DIY Handicraft Shaping Carving Pottery Artwork
Modeling with the Masters
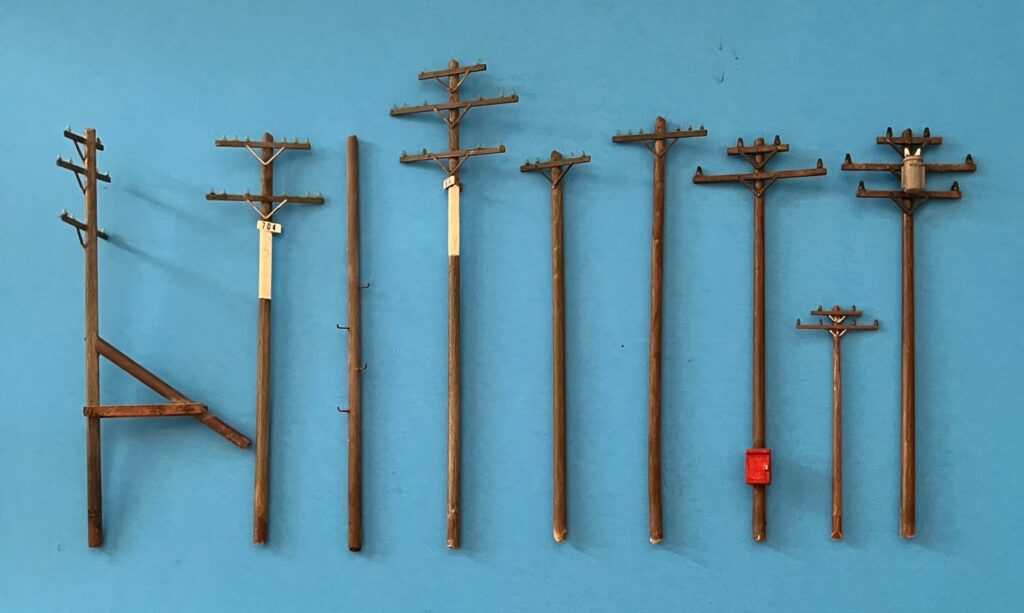
Clinic #2: Better Telephone Pole Realism
Title: “Better Telephone Pole Realism” (HO scale only) Cost: $25 Scale: HO Only
Date: Time: HO Only Time of clinic: 2.5hrs
Lead Instructor: Peter Youngblood, MMR, assisted by MMRs Clark Kooning
Description: Better telephone pole realism on our model railroads is most
often overlooked because they’re so commonplace we don’t
easily notice they aren’t always the same. Applicable to any
scale, Peter, assisted by Clark, will teach you the basics of
how and why they differ and how simple it is to make your
plastic telephone poles (supplied with clinic) more realistic.
Tool List: Self-healing cutting mat
#1 X-acto knife
#11 X-acto blades (5 pack)
Razor Saw w/fine tooth blade
Small Mitre Box
12″ or 6″ HO scale Ruler
Needle Nose Plier
Small Pin Vice
#74 Drill Bits (2 in case one breaks)
2 Paint Brushes (#00 & #3)
Emery Boards (the kind women use for their nails)
Black Marker Pen (Fine tip)
Liquid Styrene Cement
Liquid Super Glue
Clinic #3: Introduction to Building a Laser Kit
Title: “Introduction to Building a Laser Kit” Cost: $50
Scale: N scale- HO Scale -S Scale -O Time of clinic 4.5 hrs
Instructor – Clark Kooning, MMR, assisted by Peter Youngblood, MMR
Description: Clark will take you thru the steps of building a Laser Kit for the first time. Laser-cut wood is now used to create an array of precision-cut kits with parts ranging from walls with door and window openings cut ever-so-accurately to extremely fine window mullions. All parts fit perfectly together (even in multiple layers) allowing the resulting structure to appear very much like a scratch-build model. Our project will involve a bunkhouse that could also serve as a storage shed on your model railway. Clark and Peter will show you several tips and hints when working with a laser kit. If you never tried one but always thought, you would like to try here is your opportunity You should be able to complete this project in the time allotted and be able to take it home.
Tool list:
Cutting mat (should be of reasonable size) )( Suggested 18 X12) This is a must item!
X-acto knife or scalpel with #11 blades X-acto saw with fine teeth
Yellow Glue or Carpenters Glue – Small Bottle only
Flat needle file Triangular needle file Tweezers
Small modelers square (optional) or a cheap math set with 30/60 degree & 45 degree triangle (buy at dollar store or drug store)
1 Set of general purpose brushes best example is (Royal & Langnickel Value Pack Beginner 4 pc set BK607 – which is available in Michaels with sku number of 90672011312)
¼ inch stiff nylon bristle brush (2 only)
Sandpaper 240 grit (1-2 pcs) 280 grit (1-2 pcs) #120 grit and #100 grit or Small sanding tools of same grit Or a grit close to those listed.
Scale ruler in your scale (multi scale ruler is best)
Metal straight edge such as your scale ruler (or similar product)
Dental pick or similar type of tool (optional)
Optional tools Two pair of clamps (bar clamp at least 8 to 12 inches wide -depending on scale you model in.) (These clamps are available thru Micro Mart tools (see ad in MR or Craftsman magazines) or you can also use the small “Quick-grip mini bar clamp from the makers of Vise –Grip from most hardware stores.
Or any other tools you usually use…Optional tools: Optivisor, 2 inch machinist square, Extra work lights can be a big advantage depending on room lighting. —- these are handy tools which you could use in our clinics but it is not essential you buy them just for this week You’re Option!
A good way to carry all of these tools is to buy yourself a small inexpensive plastic tackle box. These are usually available at department stores year-round.
Please note an updated tool list may be sent to you prior to the program date.
Clinic#4: Building a Freight Car Shed
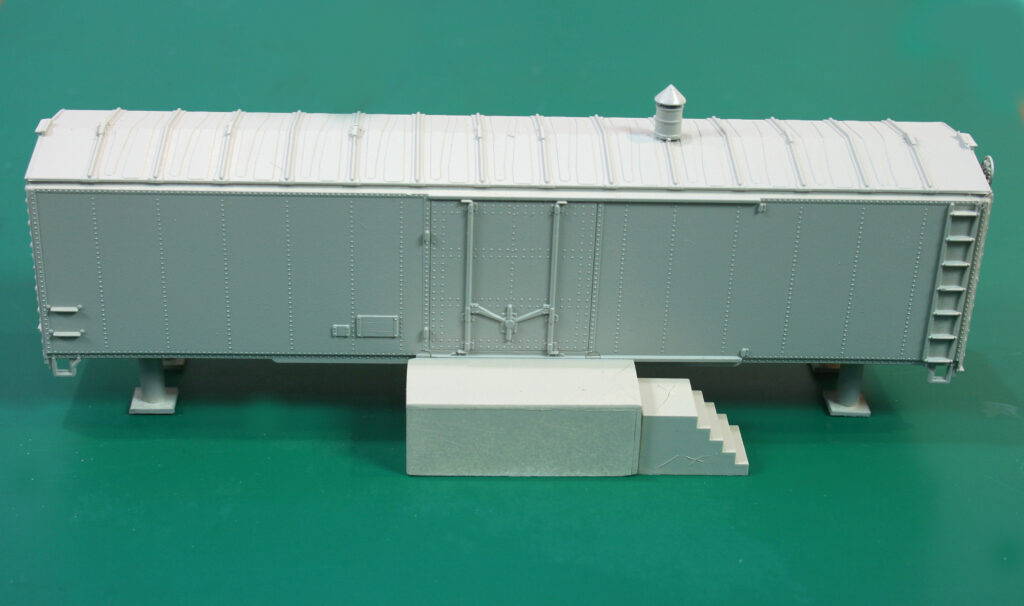
MWTM – Building A Freight Car Shed
Title: “BUILDING A FREIGHT CAR SHED” Cost:$50 Scale: HO Only Time of clinic: 4.5hrs
Lead Instructor: Peter Youngblood, MMR, assisted by MMRs Clark Kooning
Description: In this clinic Peter Youngblood will talk you through a great kit bash; start with the provided 50 ft. HO scale box car shell, add pieces cut from styrene material, apply several commercial parts and you’ve learned how to build a generic railroad MOW line side storage facility or just a storage facility for private or commercial use. Construction methods are applicable to all scales. You are required to bring your own tools.
Required Tools Participants Must Provide:
· #1 X-Acto knife
· #11 X-Acto blades (5 pack)
· Razor Saw w/fine tooth blade
· Metal Miter Box (for the above)
· 12” Metal HO scale ruler
· Small hobby square
· Emery boards (the ones women use to file their nails)
· 2 Disposable #2 Paint brushes (used to apply styrene cement))
· Self-healing cutting mat 8 1/2” x 12” (or larger is fine)
· 1 Package Handy Wipe
Students need to bring their own tools in order to participate in these clinics
Bring any other tools you usually use or might find useful.
Optional tools: Optivisor, extra work light. These are handy tools which you could use in our clinics, but it is not essential that you buy them just for this week. It is your option!
A good way to carry all of these tools is to buy a small inexpensive plastic tackle box. These are usually available at department stores year-round.
Clinic #5: Introduction to Scratchbuilding in Styrene and Wood
MWTM – Introduction to Scratchbuilding in Styrene and Wood
Title: Scratchbuilding a Small Puddle Jumper Bridge (Styrene & Wood)
Cost: $25 Scale: HO or N Date: Time: HO, N, Time of Clinic : 4 hrs
Lead Instructor: Clark Kooning, MMR, assisted by Peter Youngblood, MMR
Clark and the MWTM team will provide you with the knowledge to build a small bridge with structural elements out of Styrene and wood. You will be shown how to paint, or stain wood used for the abutments. In addition, you will learn about applying small details which make this very small bridge come alive. This small bridge can be used in many layout situations.
Tools required:
· Excto saw fine blade with Miter Box (make sure blade will go the depth of the mitre box)
· Knife with new #11 blades
· New single edge razor blade
· Toothpicks
· Steel straight edge Sanding stick or flat file Straight tip tweezers
· Hook tip tweezers
· Assorted Paint brushes
· 12” Steel ruler graduated in scale feet (for your scale)
· Small triangular hobby square
· Emery boards (the ones women use to file their nails)
· 1 (000) Sable paint brush
· Self-healing cutting mat 8 1/2” x 12” (or larger is fine)
· Pantone Markers Or Copic pens Cool gray 40% and Raw or Burnt Sienna, available at art stores and Amazon
· Testors Liquid Cement or Similar product
· Yellow or white glue and CAA glue
Or any other tools you usually use…Optional tools: Optivisor, extra work light, these are handy tools which you could use in our clinics, but it is not essential you buy them just for this week
These are Optional items. A good way to carry all these tools is to buy yourself a small inexpensive plastic tackle box. These are usually available at department stores year round
Please note an updated tool list may be sent to you prior the week of the convention
Please note an updated tool list may be sent to you the week prior to the convention or on the Convention web site


